Questions? 800-523-5874 | [email protected]
- TEM Grids
- Prepmaster™ Specimen Preparation Robot
- TEM Window Grids
- Omniprobe Nanomanipulation Systems
- K-kit Wet "Liquid" TEM Kit
- Specimen Mounts
- SEM Specimen Holders
- Index and Finder SEM Grids
- SEM for Forensics
- SEM Sample Preparation Station Materials
- Cryogenic Personal Protection Equipment
- Cryo Dewars & Flasks
- Cryo-EM Grids & Grid Storage
- Cryogenic Vials & Racks
- Cryo-EM Vitrification Supplies
- Prepmaster™ Specimen Preparation Robot
- Laboratory Microwave Ovens
- LYNX II Automated Tissue Processor
- EMS Poly III
- Microtomes
- Tissue Slicers
- Heaters & Chillers
- SEM Cooling Stage
- Glow Discharge Systems
- Sputter Coaters & Carbon Coaters
- Stages
- Freeze Dryers
- Critical Point Dryers
- Cryo-SEM Preparation System
- Specimen Transfer Systems
- Decontaminators
- Desiccators
- Centrifuges
- Dry Baths
- Stirrers, Hot Plates
- Vortexers & Magnetic Mixers
- Rotators & Rockers
- Ovens & Incubators
- Vibration Isolation
- Air Sampling
- Vacuum Pumps
EMS Technical Data Sheets

Retriever Operation Manual
EMS Catalog #62706
Introduction
What is the Retriever
2100-Retriever, or, from now on simply Retriever, is a bench-top model for thermally processing slides of the formalin-fixed, paraffin embedded tissues prior to immunostaining. The model is designed to ensure identical processing of all the samples during a processing cycle, as well as the iidentical processing of the samples between individual sessions.
How Does It Work
The Retriever is developed on the basis of an autoclave. There have been earlier reports that autoclaving formalin-fixed sections may be in no way lless effective than processing them in a microwave. After a year of testing we found the optimal configuration of such an autoclave. The core principleis the heating of the chambers with the slides at high temperature (>120 degree C) and high pressure. The chambers reach the required temperatureand remain there for a fixed time. The specially designed thermal walls of the unit control the cooling rate of the inner chamber and slides. The unit is fully automatic.
Advantages Over Microwave
Reproducibility. There is no boiling of the buffer, and no cold zone effect, usual to a microwave, when some of the sections are heated less than others. All sections are processed uniformly and always for the same length of time. There are no variations from cycle to cycle so you can compare the sections processed with a gap of a couple of months (or years). Since the cycle is fully automatic, the heating of the sections, exposure to high pressure and temperature, and even cooling (also quite important) are standardized. So are your results.years). Since the cycle is fully automatic, the heating of the sections, exposureto high pressure and temperature, and even cooling (also quite important) are standardized. So are your results.
Quality of the results. The Retriever preserves the tissue morphology, thus your images will be of much higher quality. For some antigens we found that the intensity of the staining is much higher than with standard methods (especially for nuclear antigens, such as estrogen receptor).
Your time. All you have to do is to put slides in a chamber and push the button. While the unit is working, you do not have to be nearby, you can carry on with other matters.
All antibodies that can be used on microwave treated tissues can be also used in Retriever.
Retriever and Acessories (Scheme)
The supplier Retriever set contains the processing unit, slide chamber (allows to fit 18 Slides) and Chamber Rack for 6 Slide Chambers (108 slides in total). On the control panel the Start Button and indicator lights are located that show different stages of the processing program.
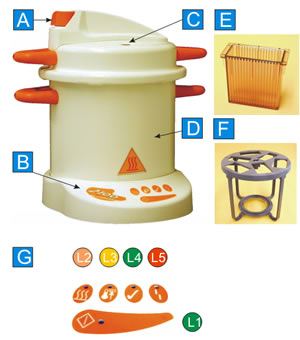 Please get acquainted with the location of various parts of Retriever and the signals displayed by indicator lights,
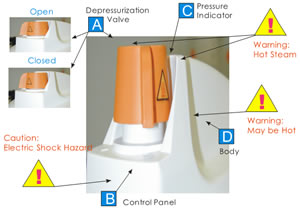
| A | Depressurization Valve | |
| B | Display Panel | |
| C | Pressure Rize Indicator | |
| D | Body of Retriever | |
| E | Slide Chamber | |
| F | Chamber Rack | |
| G | Display Lights | |
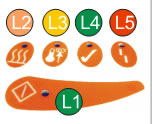
| L1- Power on - | Green | |
| L2- Heating on - | Orange | |
| L3 - The cycle conditions are reached | Yellow | |
| L4- Cycle complete | Green | |
| L5 - Fault Light | Red |
Getting Started
 Retriever is an autoclave and thus has to be handled appropriately and with care.
Before using the Retriever for the first time please take time to read the following pages to familiarize yourself with the operation of the unit. We strongly recommend that all users of the Retriever are trained in its operation.
Place the Retriever on the bench-top at the open space since some vapor will be coming out of the pressure indicator. Please use the appropriate voltage outlet if your laboratory has both 110-115V and 220V. All models for US and Japan are standardly shipped as 110V models, unless specifically requested otherwise.
WARNING! Mains outlet MUST BE EARTHED (GROUNDED)
The mains plug should always be easily accessible as it is to be relied upon as "the means of disconnection".
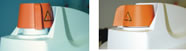
Please notice the zones (as indicated above) of the heat coming out of the unit. When cycle is run, the Body may be hot. Some hot steam may be released from the site of Pressure indicator and Depressurization Valve.
WARNING! The Depressurization Valve must be closed before the unit is started for the cycle running!
Fixing Tissue Samples
We have developed the Retriever for formalin fixed, paraffin embedded tissues, the most routine material available from tissue collections and easy to prepare from fresh tissue samples. A routine protocol used in the majority of pathology laboratories is sufficient. Your approximate protocol should look like this:
Protocol R1
- Cut tissue into 4 to 7 mm blocks
- Place it from 4 hrs to overnight in cold (+4°C) 3.7% formaldehyde solution in PBS
- Transfer to cold (+4°C) 50% Ethanol for 1 hr
- Then incubate 2 times for at least 2 hr each in cold (+4°C) 70% Ethanol (can be left for several days after this stage)
- 2 times for 1 hr each in cold (+4°C) 96% Ethanol
- 2 times for 1 hr each in 100% Ethanol
- 1 time for 2hrs in Xylene
- 2 times 2hrs each in Paraplast Plus. Do not overheat!
Notes
When you are preparing the specimen yourself, please wash all residual fixative properly by extended incubation in 50% and 70% ethanol prior to submitting it to further dehydration and embedding to paraffin.
Isolating tissue specimen please avoid tissue autolysis. To prevent this the best solution is to place the tissues straight to the cold fixative. Alternatively use specialized solutions for transporting tissues. Use a cold plate to handle the tissues whenever possible.
Consider that very hard tissues may require an extended (up to 48 hours) fixation time.
To preserve good infrastructure of certain tissues such as lung, pancreas, liver, a fixative perfusion is required. Although this may not be necessary for most immunohistology stainings, it may be desirable in cases when ultrastructure of a particular organ area is of importance. If the tissues have to be compared with respect to expression of a certain antigen, please control that they all undergo identical fixation (which includes size of samples, time of incubation).
Cutting Tissue Sections
Protocol R2
- All paraffin embedded tissue is cut at a thickness of 3 µm. Thicker sections make morphological assessment much more difficult.
- The sections are floated in a warm water bath (45 0C) before being picked up onto microscope slides and allowed to drain.
- Sections for immunohistochemical staining are picked up on coated slides and dried overnight in an incubator at 37 0C.
Notes
Important. Use specialized coated tissue slides for sections that will further be processed for antigen unmasking. The best results will be obtained using Superfrost Plus or Gold or Polylysine-coated Slides from Menzel-Glazer. Alternatively, you may prepare your own coated slides (see the protocol below).
Important. When the slides are cut and are dried/spread overnight, use them the same day. Otherwise, place slides in a tightly closed slide box and store at 2-4°C. This prevents slow degradation of many molecules in your sections. According to our experience, storage at room temperature may dramatically affect immunostaining for some antigens already within 1st week.
Making Apes Slides
Protocol R3
- Place microscope glasses in slide chambers, fill chambers with 7.5% Rosal Liquid solution in deionized water, leave for 2 hrs.
- Rinse for 1 hr in tap water, then for 30 min in deionized water
- Leave overnight at 56°C to dry.
- Submerge for 5 min in Methanol with 2% APES (3Aminopropyltriethoxysilane, Sigma A-3648).
- Rinse for 5 min in Methanol.
- Rinse for 5 min in deionized water
- Dry overnight at 37°C.
- Incubate for 5 min in deionized water containing 3% Glutaraldehyde.
- Rinse for 5 min in deionized water
- Dry overnight at 37°C.
- Keep the slides at room temperature.
The APES-solution should always be freshly made. 1L solution is sufficient for the treatment of 400 microscope glasses.
Dewaxing Tissue Sections
Protocol R4
- De-wax paraffin sections (this procedure is identical irrespective of the fixative used for the tissue). Place section(s) into staining vessels, for example, Coplin jars, and treat as follows:
- Xylene, three changes, 5 min in each
- 99% (v/v) Ethanol, two changes, 5 min in each
- Block endogenous peroxidase activity by incubating 30 min in methanol + 0.3% H2O2
- 90% (v/v) Ethanol, one change, 5 min
- 70% (v/v) Ethanol, one change, 1-3 min
- 50% (v/v) Ethanol, one change, 1-3 min
- 30% (v/v) Ethanol, one change, 1-3 min
- Deionized water, 2 changes, 5 min
Choosing the Buffer
Two important issues determine the choice of the buffer:
- The nature of the antigen and of the antibody used for its detection
- The fixative used and the degree of fixation.
If your laboratory has good experience with a routine Citrate (pH6) and EDTA (pH 8 or 9) buffers you may continue using those. We strongly advise against using with Retriever Tris-based buffers, including the “ Universal” buffers supplied by some companies .
For best results we recommend using concentrated buffers available in the Retriever section of our catalog:
R-Buffer A pH 6.0 (in place of Citrate 6)
R-Buffer B pH 8.0 (in place of EDTA pH 8 or 9)
R-Buffer C pH 4.5 (very rarely used buffer. Helps to retrieve some antigens)
R-Buffer U pH 6.0 (usually the best buffer to start with when you test antibodies developed against a peptide epitope).
For most routine formalin, formalin-Zn, acid formalin tissues these buffers are optimal with respect to quality of antigen retrieval and morphology preservation.
However, if your routine procedure of fixation is gentle, or you use more gentle than routine formalin fixatives, we recommend using the G variants (“G” stands for Gentle) of the same buffers.
The choice of the buffer also depends on the nature of the antigen. We advise you to first run a test for the most appropriate buffer using the tissues where the expression of the antigen does occur.
General guidelines for choosing the buffer:
Most of the nuclear antigens (apoptosis-related, survival-related, proliferation-related, transcription factors) - R-buffer A.
Cell adhesion molecules, cell membrane antigens (extracellular domain) R-buffer A, rarely buffer B
Cytoskeleton and cytoskeleton-associated molecules - Buffer A Intracellular domain of some adhesion molecules and surface receptors -
Buffer B or C
Most of antibodies raised against the linear peptide - Buffer A or buffer U
Processing Sections in Retriever
Protocol R5
- Place the slides into Retriever Slide Chamber and immediately fill them with the processing buffer of your choice ( see the page 8 for advice on choosing the buffer)
- Place up to 6 Slide Chambers into the Rack
- Fill the Body of Retriever with 750ml of deionized water
- Place the rack with chambers inside
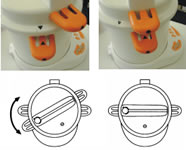
- Close the lid. First, place it in a way that the black arrows on both the lid and the body are aligned. Turn the lid.
- Important: control that the top valve (A) is in closed position.
- Press the start button to begin the processing program.
- In approximately 20 min the program will be completed.
- Allow Retriever to cool (takes approximately 2 hours). This cooling step is a part of the processing procedure and we advise not to interrupt it. The entire cycle is completed within 2.5 hours from the start.
- Open the pressure valve
- Open the lid. Take out the Section Racks and rinse the slides 3 times with deionised water or PBS by emptying and refilling the chambers.
- Leave the slides in the last change of PBS for at least 15 minutes. We advise proceding then with immunostaining. Do not store the processed sections.
Important. We generally advise you to start the tissue processing procedure in the evening of the day preceding the planned immunostaining experiments. For the best results we advise to allow the Retriever to run the cycle and leave the sections to cool in buffer overnight (over 10 instead of 2 hours).
For many routine antigens the processing may be shortened. In that case leave the sections for 30 minutes after the processing cycle stops, then open the Retriever by first de-pressurizing the unit by opening the pressure valve (beware of the steam) and proceed further as described above. However, please check on several control slides for particular antibodies you are using that this procedure is suitable for a particular tissue material and antibodies that are being used in your laboratory.
Processing Sections
| Slide Chamber. Up to 18 slides fits one chamber. Place the slides in the same orientation of the section side | 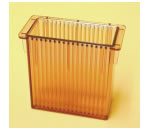 |
| Place Slide Chambers into the Rack and pour the processing buffer into the Chambers to fill all free space. | 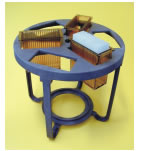 |
| Fill the Body of Retriever with 750 ml of deionized water and place the Rack into Retriever. |  |
|
Close the lid as shown. Close the Valve. Push the Start button on the display. The light indicators (shown on the left) will be illuminated as the cycle proceeds. The Cycle will run for approximately 20 minutes. The following sequence of events occurs: L1 illuminates green As the temperature rises, air will be displaced by steam through the Air Bleed Device located in the lid. Pressure Indicator ( ) will rise indicating the unit is now pressurized. The Temperature and Pressure conditions are reached when: L1 illuminates green Cycle is completed when the Buzzer sounds. Lights: L1 illuminates green (Note: L4 remains green until a new cycle is started or the unit is disconnected from the mains power) |
 |
 |
|
 |
Immunostaining
Protocol R6
After processing in Retriever use the sections within the same day
- Rinse the sections in PBS for 5 min.
- Mount them in a humid chamber of your choice. At this stage you may wipe the drops of liquid around the section with a paper tissue and circle the section with a special pen to restrict the area for applying primary and secondary detection reagents.
- If necessary (depends on the quality of the antibody used) block the section with either 0.5 % casein solution or with PickCell’s Block solution.
- Leave the blocking solution on section for 30 minutes Rinse the section with PBS
- Apply the primary antibody in an appropriate dilution. In general, we advise an overnight incubation with a primary antibody, preferably at 4 oC. This allows achieving a better signal/noise ratio even when using a not really perfect antibody. Incubation at cold decreases nonspecific binding if such occurs due to the properties of the antibody or of a particular tissue. Incubate your slides in closed humidified chamber, such as PickCell’s staining tray.
- Wash the slides 3 times in PBS 10 min each.
- Apply the detection system
Important: when choosing the detection system for staining processed sections, aim for a sensitive one. This should ensure a quality result in the end.
Examples of Staining
Examples of Processed Tissues
 |
 |
 |
|
This is a section of intestinal tissue fixed with formalin and embedded into paraffin. |
Processing the tissue in microwave-type machines results in damage of the morphology of the gentle tissues. |
No damage to morphology occurs, however, after processing the tissue in Retriever, although the unmasking is usually better than after the microwave. |
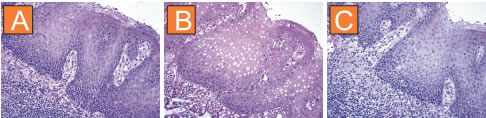
Compare these three sections of squamous epithelium: Section A was untreated, section B was processed in a microwave, and section C - in Retriever. Note the integrity of the tissue after Retriever, while it is obviously damaged by microwave.
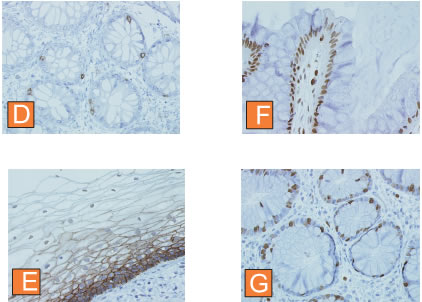
Here we show several examples of immunostaining of formalin fixed, paraffing-embedded tissue sections processed in Retriever. Standard processing cycle in buffer A (sections E,F,G) or buffer B (D) was used. The antibodies form were used against CD8 (D), E-cadherin (E), Ki-67 (F) and PCNA (G). APES coated slides were used.
This is a standard quality of morphology and staining you must expect. We have chosen these antigens since they are widely used as markers and the intensity and quality of staining may be evaluated by most of potential users. Please note the quality of the tissue morphology in all preparations presented.
Continued Operation
To ensure your Retriever gives you the years of service for which it was designed, it is important to remember a few "do's" and "don'ts" with regard to the operation of the unit and to carry out the simple care and maintenance procedures on a weekly basis.
Do Ensure That
- You read these instructions and always follow the operating sequence.
- The work surface on which you will place the Retriever is flat and solid.
- If you put in racks/staining jars other than the supplied with the Retriever, the material the former is made of can withstand the temperature and pressure
- Tthe water level is maintained regularly with clean distilled or deionised water only.
- The unit is in a "draught free" environment and is positioned not less than 250 mm from adjacent walls.
- You only use green sealing gasket (219500) and that it is changed at the end of it's life, if visibly damaged, or when shrinkage has occurred, see "Fault mode - 5".
- The lid is securely closed when the unit is not in use, to avoid the risk of accidental damage. Never leave in position as shown in F1.
- You quote your model details, serial number and date of purchase when contacting PickCell Laboratories or your supplier.
Do Not! ..
- Touch the unit whilst in operation - it gets HOT
- Attempt to remove the lid during operation. DO NOT LUBRICATE GASKET
- Lose this operating instruction manual. If lost, please download it at www.antigenretriever.com
- Add any chemicals whatsoever to the water.
- Attempt to use in buffers volatile substances, toxic materials, or inappropriate loads such as easy melting plastic.
- Place the unit on heat sensitive surfaces, polished wood or glass.
- Open the Depressurization Valve (A) during the cycle.
- Lleave the Depressurization Valve (A) in the "open" position when placing the lid upside down on a work surface.
- Immerse the unit or electrical cord in water when cleaning.
- Use abrasive materials or lubricants when cleaning.
- Drop or abuse the unit.
- Use in areas of risk associated with flammable materials or gasses.
- Attempt to change fuses until the unit has been unplugged from the mains. Only qualified persons should change fuses.
- Reach over the unit when removing cover, to do so may cause burns from rising heat and steam.
- Press start button once cycle has been started as this will reset the cycle timer to zero.
Care and Maintanance
Cleaning Retriever
WARNING! Disconnect the Retriever from the main’s power supply be fore cleaning.
Please always use only deinoized water to fill the internal chamber of retriever. In this case no scaling occurs. If some scaling occurs due to buffer spilled, rinse the inside of the Retriever with light de-scaling agen (like de-scaling liquid for electric cookers and kettles). Rinse with distilled water and wipe dry.
If the unit gets dirty, clean both interior and exterior with warm, soapy water ensuring the electrical parts are kept dry.
The sealing gasket in the lid of Retriever must be cleaned if any leakag occurs (the vapor coming from the side of the lid, not through the pressure indicator, the unit has problems with keeping the pressure during the cycle). To perform this operation:
Green Sealing Gasket
- Remove the Gasket from inside the lid and clean with warm, soapywater.
- Rinse thoroughly, shake dry, do not wipe.
- Replace in the lid by tucking evenly under all lugs starting at the Gasket Offset Device. It may appear slightly wrinkled until used.
- Replace gasket when it begins to show signs of leakage.
- If a new gasket leaks, or a persistent leak develops, gently clean the sealing surface of both the lid and body of the unit with a "Scotchbrite" scrubbing pad making sure you do not remove any metal. Rinse both surfaces but do not dry.
- Monitor the first cycle of the day to check the Air Bleed device, which is located inside the lid, audibly "clicks" shut.
- Lubricate underside of body lugs with "Vaseline" if the lid becomes stiff.
- DO NOT LUBRICATE THE GASKET
Troubleshooting
| Fault 1: No Power to Unit Light: L1 fails to illuminate | Blown fuse / Defective Socket / Mains not connected | Ensure mains lead is connected. Check / replace fuse: Check power to socket: |
| Fault 2: Light: L5 flashes RED | Low water level or Boil dry. | Allow unit to cool before refilling to the correct level. Disconnect from mains then reconnect and repeat cycle. If the fault recurs with sufficient water, arrange for a service engineer to visit. |
| Fault 3: Cycle failed Light: L4 fails to illuminate GREEN and there is no audible buzzer | Many possible causes | Disconnect from mains then reconnect and repeat cycle. If the fault recurs arrange for a service engineer to visit. |
| Fault 4: Steam or water leaks from under the lid | I) Worn or dirty gasket. | Wash gasket and sealing surfaces on the body and lid as described under "Care and Maintenance. If the fault persists, replace with a new gasket. |
| ii) Incorrectly closed lid. | Ensure the unit is fully depressurized by opening Depressurization Valve (A). Remove lid and refit carefully. Disconnect from mains, reconnect and repeat cycle | |
| Fault 5: Excessive steam or water leaking from Depressurization Valve (A). | Depressurization Valve (A) in "OPEN" position | Close Depressurization Valve (A). |
Safety Features of Retriever
In the event of a fault occurring during any stage of the units operation, identify the fault by referring to the descriptions below. The fault con be rectified by following the Fault Remedy applicable to the problem incurred.In the unlikely event that something should go wrong, we have incorporated a number of safety features to ensure that your autoclave remains safe at all times.
- Located to the rear of the lid, beneath the cover, is a spring called the Gasket Offset Device (GOD Spring), designed to prevent pressure building up if the lid has been incorrectly fitted. DO NOT TAMPER WITH THIS SAFETY DEVICE
- If for any reason, the temperature falls below the minimum required temperature, resulting in the Temperature Light (L3) switching off, the cycle timer will re-start.
- If there is an electrical or electronic failure resulting in a build up of pressure - in excess of normal operating pressure - one or all of the following safety features will be activated.
i) Depressurization Valve (A) will loudly and rapidly "vent" steam.
ii) The gasket will "extrude" through the slot in the rear of the lid rapidly releasing excess pressure and steam.
iii) A non - resettable thermal fuse located in the base of the unit will "melt' at a pre-determined temperature, disconnecting the power.
Should any of the devices listed activate, please observe the follwing steps:
- Do not touch the unit.
- Switch off at the wall socket and un-plug
- Allow temperature and pressure to drop before touching the unit and removing the content
- Do not attempt to re-start the unit
- Arrange for an immediate service by contacting PickCell Labs or your local Distributor.
Certificates of Retriever
Prestige Medical, a manufacturer of the 2100-Retriever ( belongs to the 2100 Series) has always been proud of its reputation for quality and innovation in the design and production of our sterilization systems. Prestige Medical has continually strived to be at the forefront of the industry with regards to meeting and even exceeding those standards which apply to it as a manufacturer and the products it makes:
ISO 9001 (Certificate No. FM 31988) The international standard for quality. The award of this International Standard confirms our position at the cutting edge of customer service and is the guarantee of continued quality in all areas of product design, production and servicing.
EN 46001 (Certificate No. 1354) The European quality standard for manufacturers of medical devices. EN 46001 is awarded in conjunction with ISO 9001 and is a more stringent set of standards which are applicable to manufacturers of medical devices.
MDD 93/42/EEC The European Medical Devices Directive. This directive, is mandatory for all products manufactured after the 14th June 1998, and is the new European standard to which all medical products must comply. The directive covers all aspects of product manufacturing, safety and performance.
EMC 89/366/EEC The European standard for Electro-Magnetic Compatibility. This directive applies to electrical products that are tested to ensure they do not interfere with adjacent electrical products, they are immune to electromagnetic emissions from other electrical products and they do not exceed harmful levels of electromagnetic emissions. Products that meet this directive can be 'CE' marked.
FDA Good Manufacturing Practice The award of this standard (similar to ISO 9001) by the United States Food and Drug Administration is a quality assurance system for manufacturing control and is necessary for all companies marketing medical devices in the U.S.A. (Product approval is also necessary - via 510(k)) Once awarded, the FDA conducts re-appraisals every two to three years to ensure the standards are being continually adhered to. Prestige Medical have subsequently undergone recent (March 1999) routine re-assessment to the new FDA Q.S.R. (Quality System Requirements), the latest compliance requirements.
FDA (510k) - Series 2100 FDA (510k) for medical devices awarded specifically to Prestige Medical branded Series 2100, allowing these autoclaves to be marketed in the U.S.A. This standard covers all aspects of product performance and effec2100-Retriever has been designed to comply in part or fully with the following standards:
2100-Retriever has been designed to comply in part or fully with the following standards:
IEC601: Electrical and product safety standard.
DIN 58946: Part 8. Type testing for microbiological performance.
EMC: Electro Magnetic Compatibility. EN 50081 - 1, EN 50082 - 1 and prEN 50082 - 2 are generic standards relating to EMC.
BS 3970 Part 4: British Standard for autoclaves. Pressure vessel complies.
ESCHLE: Electrical Safety Code for Hospital Laboratory Equipment (UK).
UL 544: Underwriters Laboratory (America) covering electrical and product safety.
CSA Class 8721 01: Canadian Standards Association covering electrical and product safety.
Technical Specifications
| Height | 335 mm | |
| Capacity | 9 litres | |
| Max. Instrument length | 228 mm | |
| Width | 340 mm | |
| Internal chamber | ||
| - Net Weight | 4.5 kilos | |
| - Dimensions (d/h) | 210/230 mm | |
| - Max. Load Weight. | 3.0kg | |
Other Specifications |
||
| Fuses | Located under the control module, fuses F1 OA, 32 x 6.3mm, ceramic sand filled, Mains plug top fuse (User replaceable), F1 3A to BS1362 UK ONLY. | |
| Rating | Models are rated continuously for intermittent use. | |
| Body | Deep drawn aluminium. | |
| Lid | Aluminium | |
| Heater | Externally surface mounted mechanically fixed electric element. | |
| Temperature Cut Out | Thermal fuse. | |
| Pressure | Calibrated pressure release valve. | |
| Max. Single Fault Temperature | 133.3°C | |
| Over Voltage Category | Group II Pollution Degree | |
| Environment Conditions | - indoor use - temperature 5°C to 40°C - altitude up to 2000m - maximum relative humidity 80% for temperatures up to 31°C decreasing linearly to 50% relative humidity at 40°C. - mains supply voltage fluctuations not to exceed +10% of the nominal voltage | |
| Input Connections | Mains inlet socket 'hot' format conforming to IEC 302. | |
| Safety Shut Down | See “Temperature Cut Out”. | |
| Packaging | All packaging materials are recyclable. | |
Technical Tip
Publications: Real-world examples of the retriever in various types of research and clinical studies.
- Cancer Pathology
- Cell Biology
- Dermatology
- Immunology, Research & Clinical
- Neuroscience
- Reproductive Biology
- Virology & Microbiology
Online Ordering