Questions? 800-523-5874 | [email protected]
- TEM Grids
- Prepmaster™ Specimen Preparation Robot
- TEM Window Grids
- Omniprobe Nanomanipulation Systems
- K-kit Wet "Liquid" TEM Kit
- Specimen Mounts
- SEM Specimen Holders
- Index and Finder SEM Grids
- SEM for Forensics
- SEM Sample Preparation Station Materials
- Cryogenic Personal Protection Equipment
- Cryo Dewars & Flasks
- Cryo-EM Grids & Grid Storage
- Cryogenic Vials & Racks
- Cryo-EM Vitrification Supplies
- Prepmaster™ Specimen Preparation Robot
- Laboratory Microwave Ovens
- LYNX II Automated Tissue Processor
- EMS Poly III
- Microtomes
- Tissue Slicers
- Heaters & Chillers
- SEM Cooling Stage
- Glow Discharge Systems
- Sputter Coaters & Carbon Coaters
- Stages
- Freeze Dryers
- Critical Point Dryers
- Cryo-SEM Preparation System
- Specimen Transfer Systems
- Decontaminators
- Desiccators
- Centrifuges
- Dry Baths
- Stirrers, Hot Plates
- Vortexers & Magnetic Mixers
- Rotators & Rockers
- Ovens & Incubators
- Vibration Isolation
- Air Sampling
- Vacuum Pumps
EMS Technical Data Sheets

T-Sue™ Tissue Microarray Mold Kit
EMS Catalog #69132-01
Introduction
T-Sue™ array molds are specifically designed to be simple, easy to use and inexpensive. The tissues can be analyzed in consistent conditions enhancing the efficiency of the research. The T-Sue™Microarray molds allow you to perform TMAs more quickly with excellent results. By using array molds, you can process up to 170 specimens onto one single slide in very little time.
We offer 7 different patterns to fit your needs. To facilitate orientation, one inside wall corner is at a 45° angle. Made of silicone, these molds can withstand temperatures between -100°C to +250°C and be reused hundreds of times without losing their flexibility.
Each kit includes one T-Sue™ array mold and four punch needles with stylet.
Directions
Step 2
Step 3
Step 4
Step 6

Step 7
Step 8
Step 9
Step 10
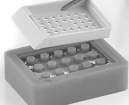
- Place the T-Sue™ Array mold in an oven for 30 minutes at 70°-80°C.
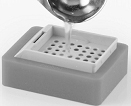
- Slowly dispense liquid paraffin (60°- 65°C) until the top of core rods are fully submerged.
Note: If bubbles form, remove them with a pair of heated forceps.
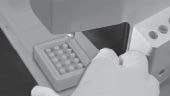
Note: Paraplast X-Tra® (EMS Catalog #19216) is the recommended paraffin. Sticky paraffins will help cores adhere better then harder ones in the recipient block. - Position a cassette on the mold – inside wall at 45 degree angle, facilitating orientation.
- Fill embedding cassette with paraffin.
- Cool at room temperature or at about 4°C for 30-60 minutes. Warning: At lower temperatures, cracks may appear in the block.
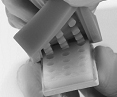
- Slowly separate the T-Sue™ Array mold from the embedding cassette.
- Trim paraffin around the edges of the recipient block.
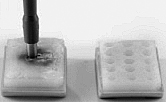
- Extract the marked tissue from the donor block by using the appropriate T-Sue™ punch needle.
- Place the donor block on a flat, horizontal surface.
- Hold the T-Sue™ punch needle in your hand perpendicularly to the marked position of the donor block.
- Slowly insert the T-Sue™ punch needle into the donor block at the proper depth of 5 mm. Don't insert it too quickly and too deeply or the donor block and the T-Sue™ punch needle may be damaged.
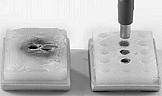
- By slowly pushing on the T-Sue™ punch needle plunger, deliver the extracted tissue into the corresponding hole of the recipient block. Then, gently push in all the tissue cores to ensure evenness for microtomy.
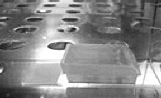
- Place the recipient block on a glass slide (facing down) and incubate the block at 37°-45°C for 3 hours up to overnight. The delivered cores will adhere to their respective holes in the recipient block. Do not pull the slide from the TMA block.
- While the recipient block is still warm and tacky, heat another slide in an oven to around 70°C for approximately 10 minutes. Pace it under the slide that is already stuck to the Array block. The Array block surface should quickly turn to liquid. Move the two slides around on the Array block to push any surface air bubbles away and to flatten the Array block surface.
- Remove second slide and place Array block with original slide (slide down) on counter for 10 minutes, letting it cool down. Once Array block is at room temperature, place it with the slide on an ice tray (no water) and let cool for 20 minutes. Slide should remove easily from Array block which will now be ready for cutting.