Questions? 800-523-5874 | [email protected]
- TEM Grids
- Prepmaster™ Specimen Preparation Robot
- TEM Window Grids
- Omniprobe Nanomanipulation Systems
- K-kit Wet "Liquid" TEM Kit
- Specimen Mounts
- SEM Specimen Holders
- Index and Finder SEM Grids
- SEM for Forensics
- SEM Sample Preparation Station Materials
- Cryogenic Personal Protection Equipment
- Cryo Dewars & Flasks
- Cryo-EM Grids & Grid Storage
- Cryogenic Vials & Racks
- Cryo-EM Vitrification Supplies
- Prepmaster™ Specimen Preparation Robot
- Laboratory Microwave Ovens
- LYNX II Automated Tissue Processor
- EMS Poly III
- Microtomes
- Tissue Slicers
- Heaters & Chillers
- SEM Cooling Stage
- Glow Discharge Systems
- Sputter Coaters & Carbon Coaters
- Stages
- Freeze Dryers
- Critical Point Dryers
- Cryo-SEM Preparation System
- Specimen Transfer Systems
- Decontaminators
- Desiccators
- Centrifuges
- Dry Baths
- Stirrers, Hot Plates
- Vortexers & Magnetic Mixers
- Rotators & Rockers
- Ovens & Incubators
- Vibration Isolation
- Air Sampling
- Vacuum Pumps
EMS Technical Data Sheets

Slide Warmer
EMS Catalog #71319-10, 71319-220, 71320-10, 71320-220
Introduction
Before using this product, please read this manual carefully to learn about the available features to obtain the best results of this equipment.
Warning: To prevent fire or shock hazard, do not expose this unit to rain or moisture. Unless labeled otherwise, this equipment should be used with AC 120V, 60Hz in the USA or Canada.
220V, 50Hz model also available.
Caution: Servicing should be referred to qualified service personnel. There are no user-serviceable parts inside.
Safety, Warnings and Precautions
- Do not touch the heating surface until it is cool.
- Do not turn on the heating surface when it is empty.
- Slide Warmer should be placed on a flat, level, heat resistant surface, free from any debris and where it cannot be accidentally pushed off.
When moving the device
- Make sure it is turned off and completely cooled before moving it.
- Unplug power cord before moving.
- Use both hands to move it to another flat, level, heat resistant surface.
- Store in a clean, dry, and secure place.
- Only use the supplied power cord.
- Be sure to unplug the device before changing the fuse.
- If a problem occurs with the device, contact your dealer. Only qualified to repair people should be contacted for any repairs; any damage resulting from unqualified repairs will void the manufacturer's warranty. Do not discard the box or any packaging material before the damage is inspected and documented by either your dealer or a representative of the carrier.
- Only knowledgeable, qualified personnel should use this device. Any misuse of this device could cause injury.
- The manufacturer and dealer are not responsible for any injury caused by the misuse of this device.
- To prevent and personal injury or damage to device, use proper safety attire and follow safe laboratory procedures while using this device.
- The surface of the Slide Warmer can be scratched or damaged by placing items on it.
- Caution: Do not block the heat ventilating holes on the side of the Slide Warmer.
| Specifications | Cat. #71319-10, 71319-220 (Small) | Cat. #71320-10, 71320-220 (Large) |
| Overall size | 10¼" x 8" x 3½" (260 x 200 x 85 mm) |
25" x 9" x 4" (640 x 230 x 100 mm) |
| Surface size | 10" x 7" | 25" x 8" |
| Capacity | Approx. 23 slides | Approx. 66 slides |
| Power | 100 Watts | 200 Watts |
| Net Weight | 7 lbs. | 19 lbs. |
| Voltage | 110V, 60Hz (Cat.#71320-10, 71319-10) or 220V, 50Hz (Cat.#71320/-220, 71319-220) |
|
| Temperature | Room temperature to 75° C; ±2°C | |
| Quality Assured Firm | ISO 9002 | |
Set Up
- Open box and remove slide warmer from packaging.
- Place slide warmer onto flat surface.
- Plug AC power cord firmly into back of unit, connect plug to power supply, and slide warmer is ready for use.
- If there is any damage to the power cord (i.e. tears, bent or damaged plug, or any exposed wires), Do not use. Contact Customer Service immediately at 1-800-523-5874.
 Operation
- Plug the Slide Warmer into an electrical outlet.
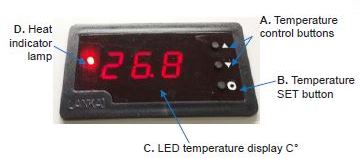
- Turn on the power switch on the side of the machine. The LED temperature display when the machine is on and working.
- Press the temperature "SET" button (B.) to see the current temperature setting.
- Set the desired temperature (shown in degrees Celsius) by using the "▲" or "▼" (temperature control) buttons (A.). The setting will appear in the LED temperature display (C.).
- Once you have entered your desired temperature setting push the temperature "SET" button (B.). This will show the actual temperature of the heating surface.
- Temperature range is from room temperature to 75°C ±2°C.
- Place slides flat on the Slide Warmer surface to help warm more efficiently.
Calibration
- Turn the Slide Warmer on and allow it to warm up for 15 minutes.
- Use a surface or infrared thermometer to measure the average temperature between the edge of the heating surface and its center. If the difference between the measured average temperature and the temperature shown on the LED temperature display is more than 5°C, the Slide Warmer needs to be recalibrated
How to Recalibrate
I. Adjust the difference between average surface temperature and displayed temperature
- Press and hold the "SET" button for 3 seconds. The LED temperature display will show "Sc".
- Press the "SET" button again and you will see the recalibration value begin to flash in the LED temperature display. This value can be adjusted so that the LED temperature display value and the measured average temperature of the heating surface are the same (the default value is 0.0).
- Use the "▲" or "▼" buttons to set the value between "-9.9" and "9.9".
For example: The measured average temperature of the heating surface is 30°C, but the LED temperature display shows 20°C. Use the "▲" button to add 10°C (the difference in temperature values). Then when you exit the settings selections (step 7) the LED temperature display will read 30°C. - Press the "SET" button again and "E" will be shown in the LED temperature display. Press the "SET" button again and "00.5" will be shown. Do not change this value. It is a factory preset and changing it will cause the Slide Warmer to malfunction.
- Press the "SET" button again and "P" will be shown in the LED temperature display. Press the "SET" button again and "15.0" will be shown. See II. for instructions on when to adjust this value.
- Press the "SET" button again and "c" will be shown in the LED temperature display. Press the "SET" button again and "10.0" will be shown. Do not change this value. It is a factory preset and changing it will cause the Slide Warmer to malfunction.
- Press the "SET" button again and your settings will be saved.
II. If the Slide Warmer does not maintain its recalibrated temperature
- Press and hold the "SET" button for 3 seconds until "Sc" is shown.
- Press the "SET" button 4 more times and "P" will be shown in the LED temperature display.
- Press the "SET" button again to see the value of "P"; this is the temperature control value. This value is equal to P/10°. This value can be adjusted so that the heating surface maintains a steady temperature. Use the "▲" or "▼" buttons to set the value between "0.00" and "99.9".
- For example, if the LED temperature display value is "50.0" and the value of "P" is "10.0" the heater will turn off and on at P/10 = 10/10 = 1°C. So the heater will turn off at 51°C and heat back up if it falls below 49°C.
- If the temperature rises too slowly or it cannot reach the "SET" temperature increase the value of "P". If the temperature rises too fast or it surpasses the "SET" temperature decrease the value of "P".
- Press the "SET" button again and the LED temperature display shows "c" (see step 6 above).
- Press the "SET" button again to save your settings.
- Monitor for 10 minutes and readjust values as necessary.