Questions? 800-523-5874 | [email protected]
- TEM Grids
- Prepmaster™ Specimen Preparation Robot
- TEM Window Grids
- Omniprobe Nanomanipulation Systems
- K-kit Wet "Liquid" TEM Kit
- Specimen Mounts
- SEM Specimen Holders
- Index and Finder SEM Grids
- SEM for Forensics
- SEM Sample Preparation Station Materials
- Cryogenic Personal Protection Equipment
- Cryo Dewars & Flasks
- Cryo-EM Grids & Grid Storage
- Cryogenic Vials & Racks
- Cryo-EM Vitrification Supplies
- Prepmaster™ Specimen Preparation Robot
- Laboratory Microwave Ovens
- LYNX II Automated Tissue Processor
- EMS Poly III
- Microtomes
- Tissue Slicers
- Heaters & Chillers
- SEM Cooling Stage
- Glow Discharge Systems
- Sputter Coaters & Carbon Coaters
- Stages
- Freeze Dryers
- Critical Point Dryers
- Cryo-SEM Preparation System
- Specimen Transfer Systems
- Decontaminators
- Desiccators
- Centrifuges
- Dry Baths
- Stirrers, Hot Plates
- Vortexers & Magnetic Mixers
- Rotators & Rockers
- Ovens & Incubators
- Vibration Isolation
- Air Sampling
- Vacuum Pumps
EMS Technical Data Sheets

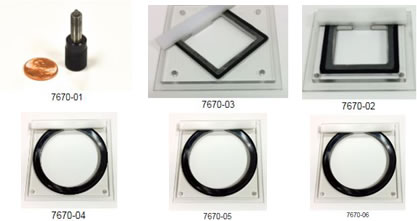
FlipScribe
EMS Catalog #7670
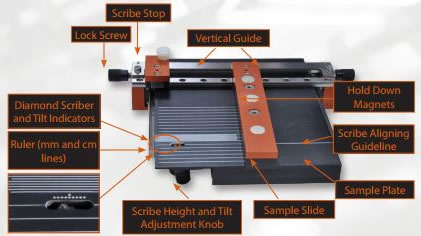
Important Tips and Setup for the FlipScribe
- Best used with magnification – can be placed under a stereoscope or by using a head magnifier
- Before starting, check the for the following using an optical Microscope:
- Scriber tip: best results are achieved with a damage-free tip
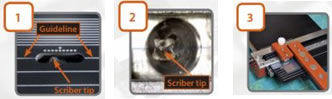
- Set the tilt and height of the diamond scribe (See Figure 1)
- Set the tilt (default setting of -2 to -3 is acceptable)
- Height of the diamond scriber tip should be set to just above the plane of the sample plate
- Final position should be: one of the sharp facets positioned horizontally, in line with the scribe aligning guideline (See Figure 2)
- Backside Scribing the Samples
- Use vertical guide and sample slide or holders to achieve best scribe
- For crystalline material, use a short scribe (set scribe stop with leading edge of sample touching scriber tip – See Figure 3); when scribing off crystal planes, you must use diamond scriber with damage-free tip and make a long scribe across the backside of entire sample
- Cleaving procedure
- Snapping – grab sample edge with scribe facing up with both hands – use thumb and middle fingers 10mm from scribe and bend sample away from scribe – will cleave along direction of scribe
- Using CleanBreak – cleave sample using cleaving pliers – plier jaws positioned on edge of sample with scribe facing aligning mark on pliers
- Cleaving over a pin – lay sample with scribe facing up over paper clip, need, fine wire or pin, pushing with fingers symmetrically on either side of scribe until sample cleaves
- Cleaving using FlipScribe – use tip of FlipScribe scriber to cleave sample – place sample on top of scriber tip with scribe facing up, pushing with fingers symmetrically on either side until sample cleaves
- We recommend using a stereoscope during this method to allow user to see sample during cleaving process
- Cleaving small samples – use small sample pliers (single point cleave)
- Holders allow the operator to secure wafers and/or samples (according to your application) securely