Questions? 800-523-5874 | [email protected]
- TEM Grids
- Prepmaster™ Specimen Preparation Robot
- TEM Window Grids
- Omniprobe Nanomanipulation Systems
- K-kit Wet "Liquid" TEM Kit
- Specimen Mounts
- SEM Specimen Holders
- Index and Finder SEM Grids
- SEM for Forensics
- SEM Sample Preparation Station Materials
- Cryogenic Personal Protection Equipment
- Cryo Dewars & Flasks
- Cryo-EM Grids & Grid Storage
- Cryogenic Vials & Racks
- Cryo-EM Vitrification Supplies
- Prepmaster™ Specimen Preparation Robot
- Laboratory Microwave Ovens
- LYNX II Automated Tissue Processor
- EMS Poly III
- Microtomes
- Tissue Slicers
- Heaters & Chillers
- SEM Cooling Stage
- Glow Discharge Systems
- Sputter Coaters & Carbon Coaters
- Stages
- Freeze Dryers
- Critical Point Dryers
- Cryo-SEM Preparation System
- Specimen Transfer Systems
- Decontaminators
- Desiccators
- Centrifuges
- Dry Baths
- Stirrers, Hot Plates
- Vortexers & Magnetic Mixers
- Rotators & Rockers
- Ovens & Incubators
- Vibration Isolation
- Air Sampling
- Vacuum Pumps
EMS Technical Data Sheets

K-kit - Silicon-based Micro Channel Device
EMS Catalog #K7260
Overview
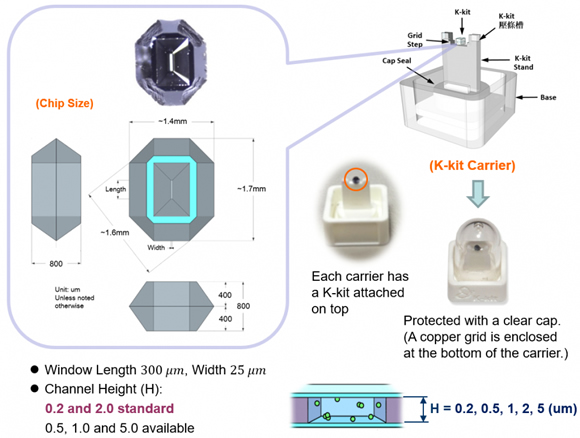
The carrier is designed as a protective container during storage and shipment. It also serves as sample preparation facilitator, incorporating the hand tools available from us (see below). Thus, the K-kit stays on the carrier plate for the entire sample preparation protocol until after the copper grid is attached.
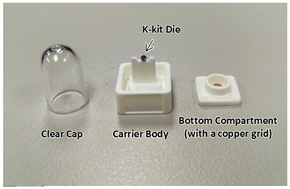
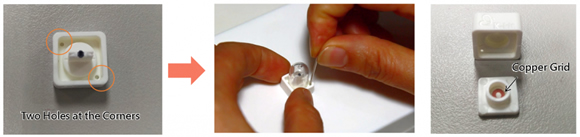
K-kit packaging includes a clear cap, a carrier with K-kit sitting on top of the plate and a bottom compartment housing a copper grid.
First, leaving the clear cap in place to protect the K-kit, use a paper clip to push open the bottom compartment through the holes at the corners.
User Guide
1. K-kit
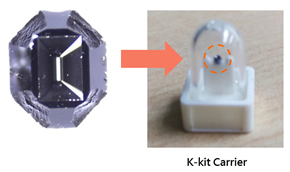
K-kits are Si-based microchannel devices with silicon nitride windows that allow TEM observation. The seemingly irregular shape is a result of KOH anisotropic wet etching, which is also responsible for forming the rectangular observation window in the middle of the device. The liquid channel is parallel to the window, with openings at both ends.
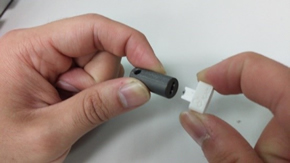
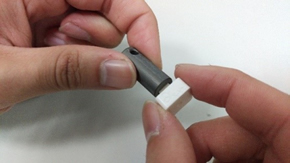
There are channel tips at each end of the channel to protect the surface condition until before use. Use the channel opener to open the channel by inserting the K-kit carrier top into the opener. Gently push in to the end. The channel opener has a self-guiding slot and a mechanism to break off the tips before the carrier top plate reaches the end.
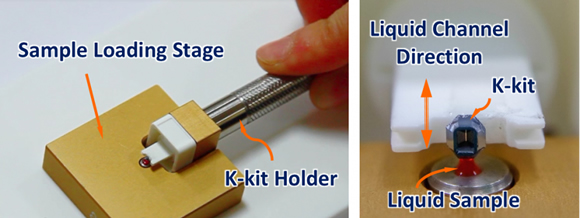
2. Liquid Loading
Place about 2 micro-liter liquid sample at the center of Sample Loading Stage. Place the K-kit carrier at the end of the K-kit holder.
Fit the notch of the holder onto the horizontal rod on the Loading Stage, forming a lever hinged on the rod. This will place the K-kit on the carrier right above the liquid drop. Lower the K-kit to make contact with liquid by gently lifting the back of the K-kit Holder.
Liquid fills the channel through capillary force. The liquid surface is “pulled up” by the K-kit. Keep the K-kit steady for approximately 1 minute to allow for the filling to complete. The aqueous liquid sample should be placed on a glass slide. Both the K-kit and glass surface are hygroscopic. Do not immerse the K-kit in liquid.
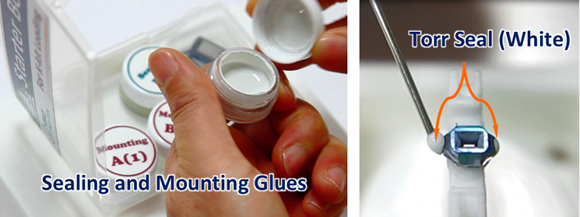
3. Vacuum Seal
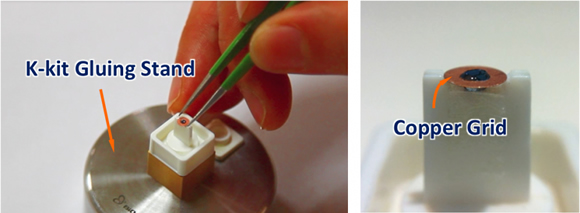
Place the K-kit carrier on the Gluing Stand. Use Needle Pen to pick and apply the seal epoxy on to the channel openings. Cover the channel openings at both ends with adequate amount of seal epoxy.
To ensure the liquid can be well reserved in K-kit, it's strongly recommended to complete the channel-sealed gluing within 1 minute after liquid loading.
4. Copper Grid
Keep the K-kit carrier on the Gluing Stand. Use Needle Pen to pick and apply the Mounting Glue epoxy on to K-kit peripheral. Then, place the supplied copper grid over the K-kit. The steps on carrier top plate facilitate centering and leveling the copper grid.
Product Information