Questions? 800-523-5874 | [email protected]
- TEM Grids
- Prepmaster™ Specimen Preparation Robot
- TEM Window Grids
- Omniprobe Nanomanipulation Systems
- K-kit Wet "Liquid" TEM Kit
- Specimen Mounts
- SEM Specimen Holders
- Index and Finder SEM Grids
- SEM for Forensics
- SEM Sample Preparation Station Materials
- Cryogenic Personal Protection Equipment
- Cryo Dewars & Flasks
- Cryo-EM Grids & Grid Storage
- Cryogenic Vials & Racks
- Cryo-EM Vitrification Supplies
- Prepmaster™ Specimen Preparation Robot
- Laboratory Microwave Ovens
- LYNX II Automated Tissue Processor
- EMS Poly III
- Microtomes
- Tissue Slicers
- Heaters & Chillers
- SEM Cooling Stage
- Glow Discharge Systems
- Sputter Coaters & Carbon Coaters
- Stages
- Freeze Dryers
- Critical Point Dryers
- Cryo-SEM Preparation System
- Specimen Transfer Systems
- Decontaminators
- Desiccators
- Centrifuges
- Dry Baths
- Stirrers, Hot Plates
- Vortexers & Magnetic Mixers
- Rotators & Rockers
- Ovens & Incubators
- Vibration Isolation
- Air Sampling
- Vacuum Pumps
EMS Technical Data Sheets

Checker Plus®
EMS Catalog #70699-02
 Introduction
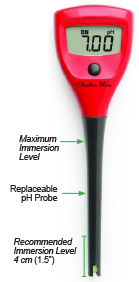
The Checker Plus electronic pH tester supplies you with fast and accurate readings on a large LCD. The electrode can be replaced, allowing the tester to last for years. Checker Plus is great for environmental, field and laboratory testing. Also suitable for checking electrodes in pipes and tanks and various laboratory applications. The Checker Plus pH tester includes a replaceable electrode with a screw-type connector, 2 sachets of 4.01 buffer solution, 2 sachets of 7.01 buffer solution, 2 sachets of cleaning solution and a plastic carrying case.
Features
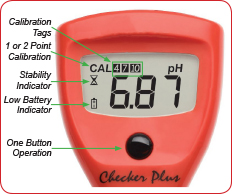
- Large and easy-to-read LCD
- High accuracy with 0.01 pH resolution
- Automatic, one or two points calibration
- Battery life: 1,000 hours of continuous use
- Wide range: 0.00 to 14.00 pH
- Replaceable pH electrode.
Specifications
| Range | 0.00 to 14.00 pH |
| Resolution | 0.01 pH |
| Accuracy (@ 250°C/77°F) | ± 0.2 pH |
| Calibration | Automatic, one or two point |
| Battery Type / Life | CR2032 Li-ion; 1000 hours, continuous use |
| Electrode (included) | H1271 |
| Auto off | 8 min., 60 min. or can be shut off |
| Environment | 0 to 50°C (32 to 122°F); RH 95% max |
| Dimensions (Meter only) | 50 x 174 x 21 mm / 2 x 6.8 x 0.9" |
| Weight | 50 g (1.85 oz) |
Special Notes
- Ensure that all products used are agreeable with desired application and environment
- Always make sure the connector is clean and dry
- Never immerse the electrode over the maximum immersion level
- White crystals may appear around the cap. This is normal with pH electrodes and theydissolve when rinsed with water
- Do not use distilled or deionized water for storage purposes
- Do not store in hazardous environments
- Do not place unit in microwave as damage/burns may occur
- Unacceptable interferences to other electronic equipment may occur while using this item
- Any modifications to equipment may damage the meter's EMC performance
Preparing the Meter
The pH electrode is shipped dry. Steps to take BEFORE using the meter:
- Remove protective cap on the electrode.
- Condition electrode by soaking the just the tip – bottom 4 cm (1.5") of electrode – in pH 7.01 buffer solution for several hours.
- Calibrate the electrode. (Calibration steps on back.)
- Connect the electrode to the meter.
- Turn the Meter on by pressing ON/OFF button.
- Remove the protective cap and immerse the tip of the electrode in the sample to be tested.
- Stir gently and wait for a stable reading.
- After use, rinse the electrode with water and store it with a few drops of storage solution in the protective cap.
- Replace protective cap after each use.
Basic Operation
Press the ON/OFF button to turn the meter on. All tags will be displayed. The meter will go into measurement mode: current reading and calibrated buffers are displayed.
 Meter Calibration
In measurement mode, press and hold the ON/OFF button until "CAL" is displayed. When "7.01" blinks on the display, place the tip of the probe into a pH 4.01, 7.01, or 10.01 buffer solution.
Use "Procedure 1" for one or two-point calibration using pH 7.01 buffer.
Use "Procedure 2" for one-point calibration using pH 4.01 or pH 10.01.
Procedure 1
For one or two-point calibration using pH 7.01 buffer
When pH 7.01 buffer solution is used as the first point, the buffer is recognized with the blinking stability indicator. When the reading is stable, the stability indicator will disappear and pH 7.01 will be calibrated.
When pH 7.01 is the only calibration point, finish this one-point procedure:
- pH 4.01 will then blink on the display
- Press Button and "Sto" will display
- Meter will then exit to measurement mode and the calibration tag will be displayed
When using pH 4.01 or pH 10.01 as a second point, continue with the two-point procedure below:
- Use pH 4.01 or pH 10.01 to perform a two-point calibration
- The value is automatically recognized and displayed with the blinking stability indicator
- When the reading is stable, the stability indicator will disappear. "Sto" will be displayed when the calibration is saved
- Meter will exit to measurement mode and calibration tags will be displayed
Procedure 2
For one-point calibration using pH 4.01 or pH 10.01 buffer
When pH 4.01 or pH 10.01 buffer solution is used as the first point, the value of the buffer is recognized and displayed with the blinking stability indicator.
- When the reading is stable, the stability indicator will disappear."Sto" will be displayed when the calibration is saved
- Meter will exit to measurement mode and the calibration tag will be displayed
LCD Readouts/Troubleshooting
| AUTO OFF | From measurement mode, press and hold the ON/OFF button. The meter will cycle through "OFF," "CAL," then current auto-off setting. The default setting is 8 minutes ("d08"). Press ON/OFF button to change default. "d60" is auto-off after 60 minutes. "d--" disables the auto-off feature. To Exit, Press and hold the button to exit the menu. |
| Clear Calibration CLr | Place meter in calibration mode. Press and hold ON/OFF until "CLr" is displayed. The meter will now be at default calibration. No tags will be shown in measurement mode until calibration is performed. |
| Err Message | In calibration mode, if the meter displays an "Err" message when in the correct fresh buffer solution then the probe should be cleaned. Place the probe in cleaning solution for 15 minutes. Rinse with purified water and place in storage solution for 1 hour before calibrating. If the "Err" message persists then the probe should be replaced. |
| Battery Indicator | When the battery is running low, the tag will blink on screen. When the battery has been depleted, "Erb" will appear on screen and the meter will turn off. |
Care and Maintenance Tips
Battery Replacement: To change the CR2032 Li-ion battery, turn the battery cover located on the back of the meter counterclockwise to unlock. Remove cover and replace with + side facing up.
Note: Batteries should only be replaced in a safe area using the battery type specified in this instruction manual. Old batteries should be disposed in accordance with local regulations.
Follow these tips to aid in attaining the highest accuracy for measurements
- Rinse probe with purified water each time before placing in buffer or sample to be tested.
- Use fresh buffer for each calibration. Note: Calibration is only as good as the buffer being used. The pH buffer values change over time once the sachets are opened.
- ALWAYS add many drop of storage solution to the protective cap when storing unit. If storage solution is not available, pH 4.01or pH 7.01 buffer can be used.
- Calibrate and measure samples at the same temperature. A large change in temperature between buffer solutions and samples to be tested will give inaccurate readings
- Calibrate using a minimum of two points for better accuracy. It is important to use buffers that bracket the expected value of the sample to be tested. Example: if the expected value is pH 8, the meter should be calibrated using pH 7.01 and pH 10.01 buffers.
Replacement Probe
The EMS catalog number for the replaceable probe is 70700-01.