Questions? 800-523-5874 | [email protected]
- TEM Grids
- Prepmaster™ Specimen Preparation Robot
- TEM Window Grids
- Omniprobe Nanomanipulation Systems
- K-kit Wet "Liquid" TEM Kit
- Specimen Mounts
- SEM Specimen Holders
- Index and Finder SEM Grids
- SEM for Forensics
- SEM Sample Preparation Station Materials
- Cryogenic Personal Protection Equipment
- Cryo Dewars & Flasks
- Cryo-EM Grids & Grid Storage
- Cryogenic Vials & Racks
- Cryo-EM Vitrification Supplies
- Prepmaster™ Specimen Preparation Robot
- Laboratory Microwave Ovens
- LYNX II Automated Tissue Processor
- EMS Poly III
- Microtomes
- Tissue Slicers
- Heaters & Chillers
- SEM Cooling Stage
- Glow Discharge Systems
- Sputter Coaters & Carbon Coaters
- Stages
- Freeze Dryers
- Critical Point Dryers
- Cryo-SEM Preparation System
- Specimen Transfer Systems
- Decontaminators
- Desiccators
- Centrifuges
- Dry Baths
- Stirrers, Hot Plates
- Vortexers & Magnetic Mixers
- Rotators & Rockers
- Ovens & Incubators
- Vibration Isolation
- Air Sampling
- Vacuum Pumps
EMS Technical Data Sheets

UV Stable Adjustable Pipetters
EMS Catalog #72430 Series
Introduction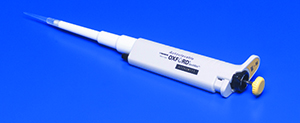
This air-displacement pipette is made from temperature and chemical-resistant materials. It features a digital volume meter with maximum volume for the pipette is shown on the plunger button. Also, the pipetter has a tip ejector for easy removal or the used tip.
How to Use
- Use only when a pipette tip has been attached.
- DO NOT allow liquid to enter into the pipette.
- Set volume from higher value down to lower value (go above desired volume, then return to that volume).
- Operate push button slowly and smoothly to ensure proper application.
- Pre-rinse each new tip with the liquid to be pipetted.
- NEVER force the volume meter beyond its recommended limits.
- With organic solvents and aggressive chemicals, check the chemical compatibility of the pipette tips and the pipettes.
- When using solutions with physical properties which are very different than those of water, such as glycerol, be sure to check the dispensing volume.
- Pipettes, pipette tips and liquid used should all be at the same temperature in order to ensure using the correct volume.
Operation
Volume Setting
- Rotate the control button to continuously change the volume.
- Figures in the volume meter are read from top to bottom.
- Set volume from higher value down to lower value (go above desired volume, then return to that volume).
Attach Tips
- Firmly attach desired tip to pipette.
- Remove tips from the tip box using the pipette
- Firmly attach desired tip to pipette. (Never aspirate any liquid until the tip is firmly attached.)
Aspirating Liquid
- Press down the control button to the first stop. (Image A).
- Immerse pipette tip approximately 5 mm into the liquid, making sure the pipette remains in a fully vertical position. (Image B).
- Wait three seconds. Allow control button to slide back slowly.
- Pull the tip out of the liquid.
NOTE: To remove any droplets, dab with non-fibrous cloth. Make sure no liquid comes out of the tip.
Dispensing Liquid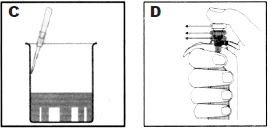
- Hold tip at angle, against the inside of the vessel walls.
- Press DOWN the control button slowly to the first stop. Wait one second.
- Press DOWN the control button slowly to the second stop to blow out any remaining liquid.
- Hold down the control button and pull the tip from the inner wall of the tube.
- Allow control button to slide back slowly.
NOTE: To remove tips, press the eject button on the side of the pipette.
Caution
- Do not lay down the pipette when a filled pipette tip is attached. This may result in liquid entering the pipette's internal mechanism.
- With serum and/or high-viscosity solutions, wait a few seconds longer when aspirating and dispensing.
Special Considerations
To ensure accuracy, rinse new tips by aspirating and dispensing liquid three times before pipetting.
Calibration
Test can be performed by weighing the volume using an analytical balance with a suitable level of sensitivity.
NOTE: The distilled water, weighing vessel, pipette and pipette tip must all be the same temperature.
NOTE: Pipettes were tested during production in accordance with the test conditions for pipetting water samples. If the accuracy of the pipetted volume is in question, check to make sure that:
... The pipette is not leaking.
... The temperatures of the sample, the pipette and the air are the same.
... The sample does not have a different density than water.
... The pipetting speed is not too fast.
If these checks prove unsuccessful, it is safe to assume that the calibration has to be altered.
In Case of Error
From the technical standpoint, this is a zero-decimal shift. The value by which the setting of the pipetter is shifted remains constant across the entire measuring range.
Example:
Take a 10-100µl. Follow up alignment of 1µl takes place at 100µl (=1%), the pipetter is also adjusted by 1µl at 10µl (=10%).

- Pipette, tip and water must be the same temperature. (20-25°C), =/-0.5)
- With an adjustable pipette, the pipette is set to the nominal volume required.
- With pipette tip attached to the pipette, pipette and weigh the desired volume 10 times.
- The mean of this weighing is converted into µl using the following formula: Volume = Weight/Density of liquid (at the specified temperature) NOTE: To align volume displayed, insert wrench (Figure 1) horizontally into the alignment opening in the pipette grip. (When doing so, hold onto the pipette vertically.) To reduce volume, turn the setting ring clockwise; to increase the volume, turn the setting ring counterclockwise (Figures 2-4).
NOTE: When setting ring is rotated either way, the piston stroke of the pipette is altered, although the volume setting remains unchanged.
- Remove the wrench and move the setting ring backwards and forwards until the counter and stroke system lock together.
- Repeat step 3. The readings must be within the tolerances specified. If the nominal volume does not correspond with the measuring result, repeat step 4.
NOTE: Since this adjustment affects the entire measuring range, it is imperative to check the other volumes of this pipette specified in the technical data.
Varying Density Liquids
The pipette is able to compensate for solutions of density much different than water by setting the volume slightly higher or lower than required.
For liquids less dense than water, compensate by setting the volume meter lower than the required value.
For liquids denser than water, set the volume meter higher that the required value.
Example:
Pipetting 80µl of serum using 100µl pipette.
- Set volume meter to 80µl.
- Aspirate a volume of liquid and measure it gravimetrically.
- If volume is measured as 79.1µl, the error is 0.9µl. Increase the volume meter setting by 0.9 to 80.9µl and repeat the measurements.
If the second measurement is not accurate enough, make another slight volume adjustment until the measurements are as desired. (See steps 1- 6 above.)
Cleaning
Pipettes: Clean periodically with a soap solution or 60% isopropanol. Rinse in distilled water and let dry.
Seals: These are maintenance-free.
Pistons: Should be lubricated lightly with silicone grease when cleaned or replaced.
Sample contamination caused by the liquid entering the pipetter can be removed after the pipette has been disassembled.
Sterilization
The entire pipette can be sterilized by steam-autoclaving (121°C, 15 psi, 15 minutes) The pipette will need to be recalibrated after autoclaving. Let the pipette dry at room temperature before use. Any discoloration which may occur has no effect on the function of the pipette.
Troubleshooting
| Problem | Cause | Solution |
| Droplets on inner wall of pipette tip |
Contaminated/dirty pipette tip | Use a new pipette |
| Pipette is dripping and/or volume pipetted is incorrect | Tip is loose | Press tip onto end of the shaft firmly |
| An unsuitable tip has been used | Use correct tip | |
| Tip is removed too quickly | Pull tip slowly out of the liquid | |
| Piston is contaminated | Clean and lightly lubricate the piston | |
| Piston/seal is damaged | Replace piston/seal | |
| Assemply is loose | Tighten the pipette assembly nut | |
| Control button jams and does not move smoothly | Piston is contaminated | Remove piston/seal from the pipette. Clean piston/seal with DI water. Replace piston/seal if necessary. |
| Liquid has entered the nose cone and dried | Remove piston from the pipette lower part, rinse out lower part with warm water, then rinse with DI water and dry. |
NOTE: When removing the shaft from the pipette body, be sure the spring, seal and o-ring do not fall off the piston.